Hello All,
March has been a busy month. I find myself a year older and I hope a little wiser. I apologize for not have anything new lately. Fear not I am still working on the G.B.S, but I have not made enough progress on it to justify a post.
Instead I have decided to put up another project I have been working on as a prototype for NOVA Open LLC. Some simple water features I made with Sand,Glue and some old CDs. I used Woodland scenic realistic water and various paints to complete the project. You could use the same process with MDF board or Plastic.
Arctic Theme (frozen pool)
Marshy Pond
Toxic Pool
Step 1
Get some old CDs. I selected some outdated backups I found in a moving box from 2005. They are pretty much worthless so I figured what the heck. You could also use old Music CDs or Video games that you really hate.
Step 2
The first thing you want to do is cover the hole in the center of the CD. I used paper since it was thin. After gluing a small bit in place to cover the hole I saturated it with super glue and accelerator to seal it up and prevent the realistic water from soaking through.
Step 3
Next take some glue and water and pour it into a disposable plastic cup. 50/50 mix should work. Now add sand to the mix. keep adding till the mix no longer looks slimy stir often. It should look like a thick paste. add water/glue if it looks too thick. I cannot really explain the exact amounts. It is a trial and error thing. :)
Step 4
Now that the CD is Prepped and the sand mix is ready. scoop some out around the edge of the CD. You can make it as thick or thin as you like. The important thing is make sure the ring goes all the way around the CD without gaps. You can also add some to the interior if you want more texture showing through or you want some of the sand poking out of the water. When you are satisfied leave it to dry. 24 hours or so should be OK, but I have seen it take 36 to 48 for a really big piece.
Step 5
Painting. Most of mine were done with an Airbrush but you could just as easily use a normal brush.
I base coated each disk in black then a coat of the basic color for each theme.
 |
| Basic Black |
 |
| Brown for Marsh and Toxic pool |
 |
| Grey for arctic |
After the basic color was painted on I used the airbrush to color up the open spaces. I went for contrast and I wanted to pick colors that emphasized the theme. First I hit each open space with a light grey. Then I washed each one with a vibrant color to help them show through at the end.Yellow greens for the toxic. Darker greens for the pond and blue for the arctic.
 |
| light grey base |
 |
| Blue Glaze for Arctic |
 |
| Florescent Green for Toxic |
 |
| Green Glaze for the Marsh pond |
Once this dried I used good old dry brushing the sanded parts to bring out the details. I went 4 shades lighter than the base color for each. I figure if you want to make one you should look to your normal basing style and just match it up.
Step 6
Water effect. There are plenty of great videos on You-tube for using realistic water and if you are unsure how I suggest checking them out before start. I simply poured some realistic water into the base of each pool and allowed it to dry for 24 hours. This layer is really thin and should only coat the bottom of the pool. Next I poured some realistic water into a plastic cup then added a few drops of Acrylic based color to the Toxic Pool and the Marsh pond then poured it into the pool over the first layer. Doing this helps the underlying details show through when all is said and done.
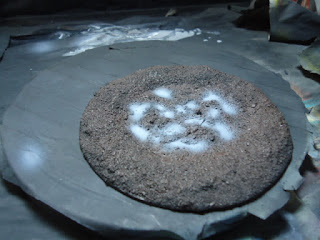
For the arctic pool I followed the first step but when it came time to pour the second layer I poured it clean then added three drops of a mix of White weathering powder and distilled water. Using a toothpick I swirled it around into an interesting pattern then let it solidify. The end result gives the impression of frozen water.
 |
| See the patterns |
Once Dry they looked like this.
 |
| Marshy Pool |
 |
| Toxic Waste Pool |
 |
| Frozen Pool |
Well that's all the time I have for now.
Later
RGH


Looks good. The ice effect is very realistic, and they look better in person.
ReplyDelete