Thursday, February 25, 2016

Painting the Great Brass Scorpion part 3


Hello All,

Welcome to part 3. Remember when painting my Great Brass Scorpion (GBS) I generally followed the instructions presented in Imperial Armor Masterclass Volume 2 with a few exceptions.


The last installment seems like soooo long ago. 3 weeks. February has been a rough month for me since the last update I have had to deal with Staff reductions at work forcing me to work late hours. I had to buy a car because my 11 year old Honda finally gave up the ghost. I attended the first session of the NOVA Open 2016 terrain builds (this was a fun activity but a lot of hard work so it is in the tally) and to top it off I am coming down with a cold or Flu or something. 

As I stated last time I will be going over the brass banding and finishing off the plates.


For a refresher- Part 1 and Part 2 

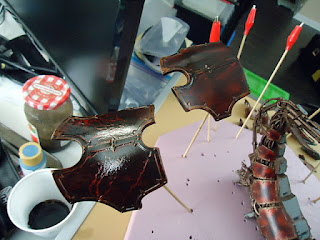
Finishing the plates

The banding that surrounds each plate was base coated with Vallejo Game color Tinny Tin then GW brass scorpion. The edges were hit with Vallejo Game Color Bright Bronze. 


Once done and allowed to dry I went in with a wash made from Winsor & Newton Winton Oil Color Burnt Umber and Winsor & Newton Winton Oil Color Black (these are the level 3 “professional” artist quality oil paints I bought at Michaels) and artist grade paint thinner Mixed 1:1:3. This was painted over the entire plate and allowed to set for around 45 minutes or so. 


After this I took a cloth rag (actually an old shirt) and gave each plate a good rub down removing most of the oil paint except in the crevices where it dark lined the plates beautifully. 


It also mellowed the brass and the red a little giving them complimentary tones.  


Well that's it for now. Next up I will be attacking the main body  and all the lovely cables and corpses.

Till then

Later

RGH

Thursday, February 4, 2016

Painting the Great Brass Scorpion part 2


Hello All,

Welcome to part 2. Remember when painting my Great Brass Scorpion (GBS) I loosely followed the instructions presented in Imperial Armor Masterclass Volume 2 with a few exceptions.


Part 1 can be found here

Products used
Sotar 20/20 – Airbrush
Vallejo Airbrush thinner
Vallejo Satin Varnish
Vallejo Gloss Varnish
Tamiya Acrylic Paint Thinner (X-20A)
Tamiya Clear red (X-27)- Glaze
Tamiya Clear Blue (X-23)- Glaze
Tamiya Clear Yellow (x-24)- Glaze

Glazing the Armor Plates

Using Tamiya Clear red I went over the plates. The Tamiya clear line have the consistency of cough medicine so make sure you dilute it to a good Airbrush consistency using Tamiya Thinner (not water.) I repeated this 4 times (More thin coats is better than fewer thick coats) letting it dry between each coat.


Next I went over each plate with a glaze of Tamiya Clear Blue same as above but only twice.


Next I repeated the above with Tamiya Yellow. Note the Armor class book suggested Orange but I felt yellow made it pop more.


Lastly A final layer of Tamiya Clear red was painted over the plates to bring it back to a red (It was starting to look orange.)


Next the plates were given a coat of Vallejo Satin Varnish to protect the layers of glaze and tone down the overall effect then followed up with a layer of Vallejo gloss Varnish (thinned) to put a little shine back in it. 


Tamiya paints especially those of the the clear line should be allowed to dry thoroughly. I allowed each coat to dry for about an hour and allowed each color change to dry overnight. It took four nights to complete the transition. 

Up Next The Brass Banding on the plates...


I hope you are enjoying this.

Till next Time

RGH